File Setup for Full Bleed Printing
Read on to learn more about file setup for full bleed printing.
Before any project gets printed, it must be formatted into a print-ready file. Understanding bleed, same zones, and borders is an essential step to printing your project and a must-know for any creator.
In most types of projects, printing goes all the way to the edge of a page. Pick up virtually any book from a shelf and in most cases you’ll see that the artwork extends all the way to the very edge. To ensure there are no blank areas at the edge of your page, an extra 0.125 inches of artwork is required beyond the trim line to accommodate for what is known as “bleed.”
Our full text based guide for bleed setup continues below. If visual learning is more your speed, check out our video guide on bleed setup!
Full Bleed Printing
The bleed area (depicted in red below) will be cut off in the final product, but printing it helps to ensure that your design will fully extend to the end of the page. This is because there is a standard cutting variance of up to 1mm inherent in professional printing processes. By incorporating an extra 0.125” of artwork into your design, you’ll create a buffer to accommodate for this variance.
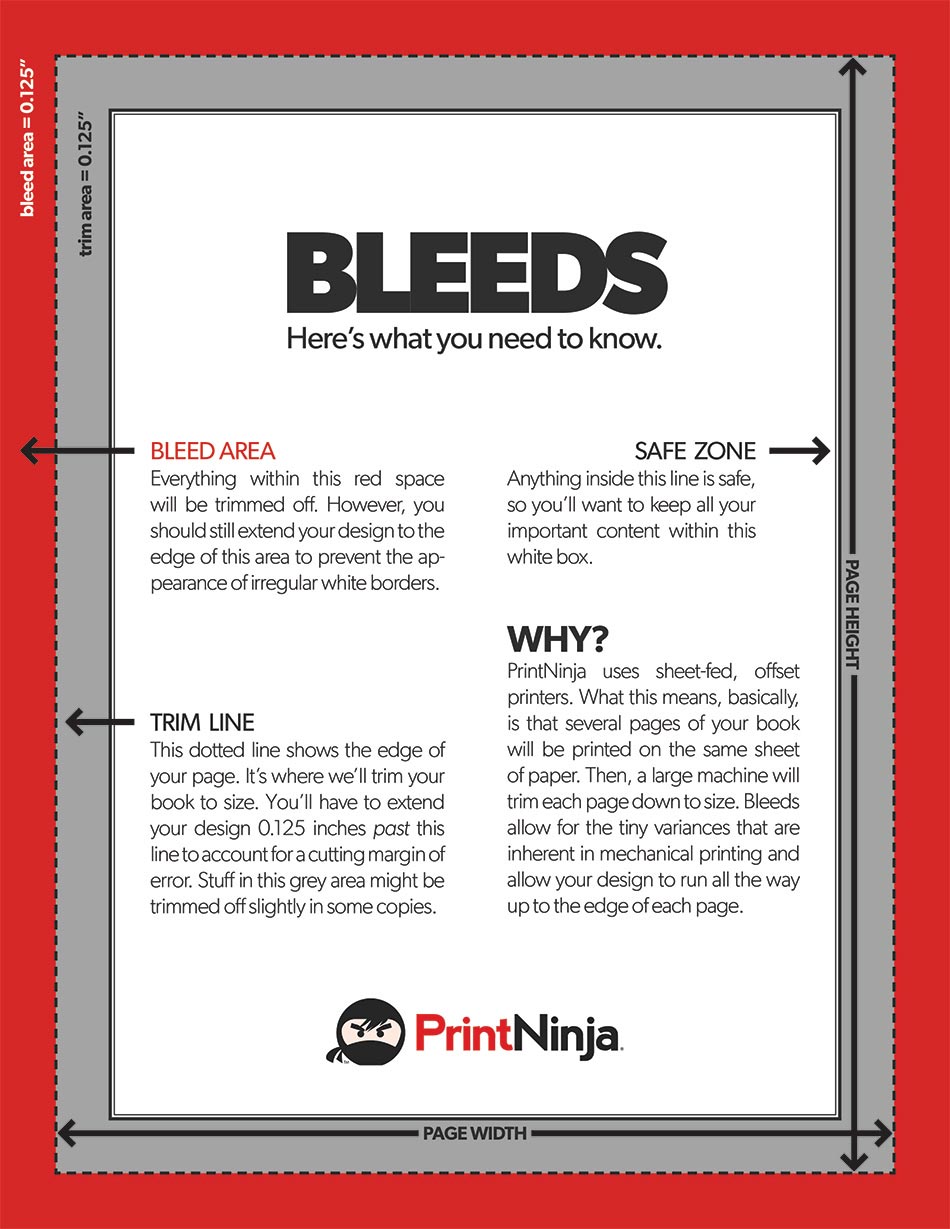
Here’s what you need to know:
Bleed Area
Everything within the red space in the above image will be trimmed off. However, you should still extend your design to the edge of this area. This will prevent the very edge of your project from having an irregular white border due to trimming variance.
Trim Line
The dotted line in the above image represents the edge, or trim, of the page. Your book will be trimmed to size along this line, but you’ll have to extend your design 0.125” past this line to account for trimming variance. Additionally, because the variance can be 1-2mm in either direction, it’s a good idea to leave any critical components of your design out of this area.
Safe Zone
When setting up your file for full bleed printing, it’s also a good idea to keep any critical text or important graphics at least 0.125” inside the trim line. This is called the “safe zone,” and is shown in white in the above image. The areas depicted in gray are not within the safe zone, and therefore could be at risk of getting trimmed off during production. Note that the variance can be 1-2mm in either direction.
Uniform Borders Consideration
If you are looking to print uniform borders in your project (for example: comic book panels), we recommend keeping them 0.25” inside of the trim line, or double the normal safe zone, to account for the 1-2mm trimming variance.
Project Visual Examples
To aid in further explaining why designing a thicker uniform border is recommended, we have provided visual comparisons of production file PDFs vs the final manufactured project.
Comic Book
See below for an approved production file PDF example vs the final product (from our comic book printing service) with uniform 0.125” borders:

As you can see, the border did NOT print uniform and is quite obvious to the naked eye. If the project had included thicker uniform borders, the unavoidable manufacturing variance would not have been so obvious to the naked eye.
Card Game
See below for an approved production file PDF example vs the final product (from our custom card game printing service) with uniform 0.125” borders:

As you can see, the border did NOT print uniform and is quite obvious to the naked eye. If the project had included thicker uniform borders, the unavoidable manufacturing variance would not have been so obvious to the naked eye.
Why is bleed important?
PrintNinja uses sheet-fed, offset printers. This means several pages of your book will be printed on the same sheet of paper. Then, a large machine will trim each paper down to size. Bleed allows for the tiny variances inherent in mechanical printing to ensure your design will run all the way to the edge of each page.
Project Visual Example
To aid in further explaining why bleed is an important and necessary part of production, we have provided a visual comparison of a production file spread PDF vs the actual manufactured print.
See below for an approved production file PDF example (please note: we have added printers marks to the artwork on our end – artwork should NOT be uploaded with printers’ marks):

You will see that the TRIM and BLEED area have been pointed out. The artist has made sure to extend the artwork to the full bleed area.
See below for the actual printed project:

You can see the bleed area was trimmed off, but because the artwork included bleed and was not left white there is not an unsightly white edge along the page.
Adding Bleed to Your File
We have outlined steps here in our resources to help you set up files with bleed room using the program of your choice, including Adobe InDesign, Photoshop, and Illustrator.
An Important Note About Borders: Due to the variance of up to 1mm in cutting, we recommend that any borders you would like to include on the perimeter of your page extend a full 0.25 inches inside of the trim line, which is twice as far as the safe zone. This way, your borders will appear even, regardless of the standard cutting variance.
Ready to get started?
We’ve created a custom pricing calculator for you to explore all our different printing choices, shipping methods, and get an instant price for your project. You can also customize just about anything, from size and paperweight, to specialty options like metallic ink, foil stamping, and so much more.
Get Your Price