Emboss and Deboss File Setup Guide
Follow along with our emboss and deboss file setup guide to correctly prepare your files for printing.
Embossing or debossing your project is a great way to add a special touch to your work and help it stand out. Properly setting up your embossed/debossed files is the first step in adding this memorable feature.
Design Considerations and Restrictions
- Debossing and Embossing artwork needs to be at least 2mm thick with 1mm spacing between elements to produce accurately. If the width and spacing is less than 1mm “plugging” may happen – which is when the artwork clumps together to form a solid shape.
- Intricate, complex Debossing and Embossing is NOT recommended
for Cloth or Faux Leather covers. The material does allow for intricate/fine detail. - Cannot be done on Slipcases.
- Can only be applied to paper weights of 135 lb text or heavier.
- CASEBOUND HARDCOVERS (INCLUDING FAUX LEATHER & CLOTH)
– Emboss and Deboss artwork must be at least .125” inside foldover areas.
– Emboss and Deboss artwork must stop .125” away from the hinge areas on either side of the spine.
– Emboss and Deboss artwork can be placed on the spine, but it must be at least 2mm away from the left and right edges of the spine.
– Emboss and Deboss artwork cannot cross over the hinge and spine area continuously.
PERFECT BOUND & BOARD BOOK COVERS
– Artwork crossing over the spine and score areas (perfect bound) is not recommended.
For a video breakdown on setting up your Emboss/Deboss, check out the following visual guide. More of a textual learner? Have no fear, we also have a full text based guide below!
To add emboss or deboss to your project you will need to submit two versions of your cover:
- 1. A full color file that contains all images that will be on your cover.
- 2. A single-color file containing only the emboss/deboss element as a solid-black image or text
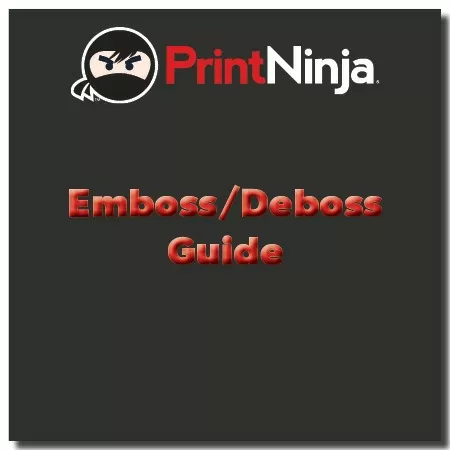
Example of an Embossed or Debossed File
Below are the two cover files you need to submit. Both should be sized correctly according to our cover guides.
The first file, which is in full color, contains all of the elements of the cover including the embossed/debossed title. Since the process simply raises or lowers part of the cover the entire cover will need to be printed before the emboss/deboss is applied.
The second file, which is submitted as solid black only, contains only the parts of the cover that will be embossed or debossed. Note that only the text is included on this file. The text needs to line up perfectly with the full color file for accurate results. “Blind” embossing or debossing is also possible, where instead of affecting a specific printed element (such as the title) you can emboss/deboss a shape or text in an otherwise solid area of the cover.
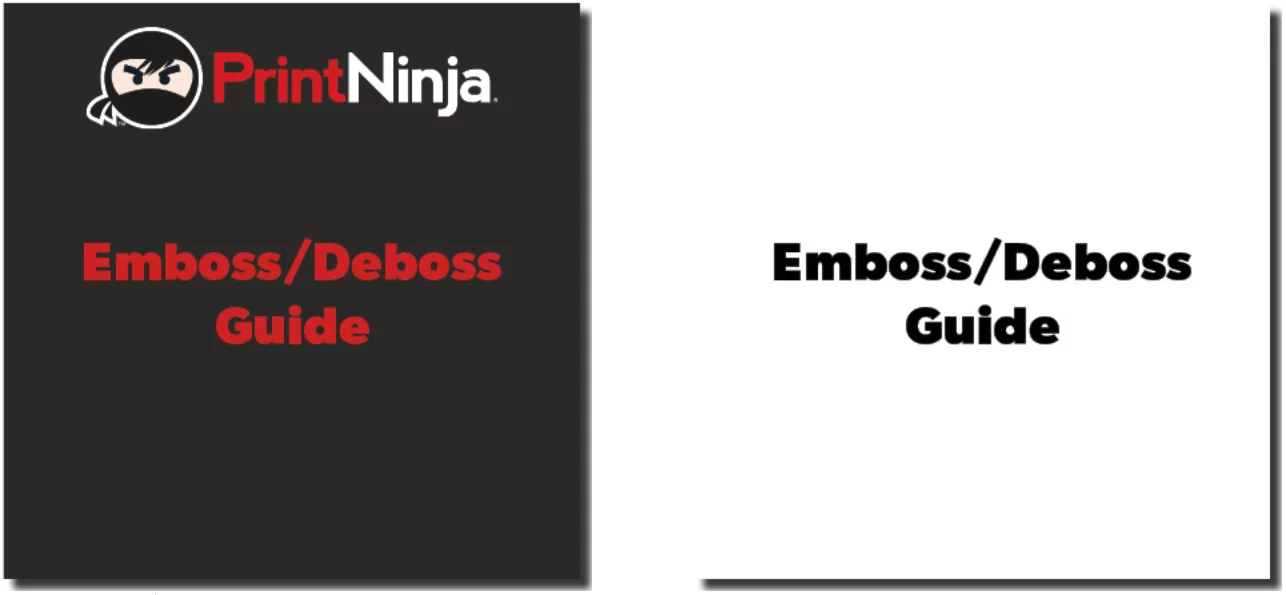
To the right is how your final cover will look with the emboss/deboss applied. The “Emboss/Deboss Guide” text will be raised or lowered, while the background and the PrintNinja logo will not be affected.
Click here for a PDF download example of print-ready emboss/deboss artwork based on the above examples.
Ready to get started?
We’ve created a custom card game pricing calculator for you to explore all our different printing choices, shipping methods, and get an instant price for your project. You can also customize just about anything, from size and packaging, to specialty options like embossing/debossing and so much more.
Get Your Price