PrintNinja - online printing made easy for creators
Ink Saturation and Density Guide
Read on to learn how to avoid ink density issues with our ink saturation guide.
For years, PrintNinja has been the foremost offset printer and source for printing knowledge. Over this time, one of the most common errors we see in file setup is that of improper ink saturation.
In any form of printing, ink saturation is less precise than color reproduction on a computer monitor, meaning your project may print differently than what you see on your screen. For this reason, it’s important to avoid using extreme saturation values whenever possible. Follow the suggestions below to reduce ink saturation extremes on your printed pages.
Saturation Extremes
All printing methods, including offset, become unreliable at extremely high or low ink saturations on a single color (under 10% or over 90%). The extremely low ink saturations may not print at all, and the extremely high ones may be indistinguishable from a solid color (100%). This problem most often arises in black-and-white printing, so we’ll use examples from the black, or Key plate.
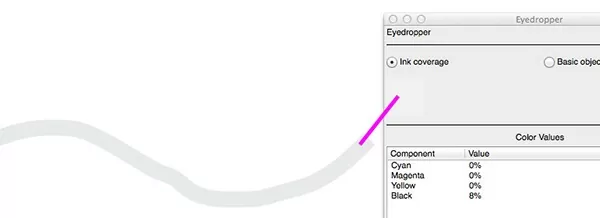
At 8% Saturation, This Line is Unlikely to Print
Too Light
In the example on the right, you can clearly see the grey line. You can also see from the eyedropper tool that the black ink saturation level is 8%, which is below the 10% recommended minimum.
If this file were to go to press, it is very likely that the line would not print at all.
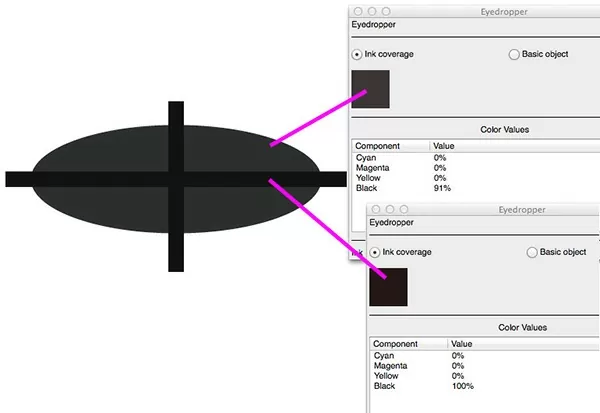
At 91% And 100% Saturation, These are Likely to Be Indistinguishable in Print
Too Heavy
In the example on the right, you can clearly see the cross set within a circle. The cross has black saturation values of 100%, which is as dark as the black offset plate can print. However, the circle has a black saturation values of 91%.
While it’s easy to see the difference between the two shapes on a computer screen, it will be almost impossible in the finished printed product; instead, both of these areas will look completely black.
Ink Saturation Scale
Most people that are new to printing often find that their final product comes out slightly darker than they anticipated. Unless they opted for a hard copy proof, which allows your to visualize your physical project in full color before the full run begins.
This is because even though your computer screen can show differences in colors with extremely high ink saturation, on the printed page most high-saturation colors end up looking very dark and muddied.
In the 4-color CMYK process, each pixel has an ink saturation level between 0% and 100% for each of the 4 colors – Cyan, Magenta, Yellow, Black – meaning the maximum saturation for a pixel is 400%. That’s all 4 printing plates distributing the highest possible amount of ink onto the paper.
In the swatches below, you can see how your monitor displays 4 different browns from 100% total saturation to 400% saturation. However, this can be deceptive.
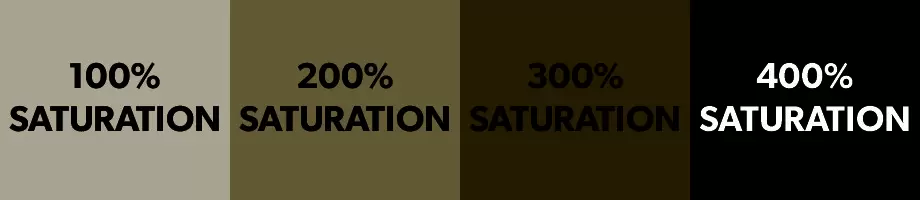
Best Saturation Level to Use for Offset
Based on your monitor, it may seem that 300% saturation still retains much of its character, but as you approach the 300% total ink saturation level in print your colors will all appear very dark. The large amount of ink on the page reduces the reflected light that gives the color its character. Your computer monitor is not subject to this limitation since it generates its own light, so retains much of its character on-screen.
We recommend your color choices, even your darkest sections, stay within the 150%-250% range. This area will show a lot of color flexibility, while preventing the muddied look when colors approach 300% and above. This is especially important to keep in mind if you’re converting your own colors from RGB to CMYK, since the ink saturation values automatically generated in conversion may be higher than optimal.
PrintNinja Tip
Ready to get started?
We’ve created a custom pricing calculator for you to explore all our different printing choices, shipping methods, and get an instant price for your project. You can also customize just about anything, from size and paperweight, to specialty options like metallic ink, foil stamping, and so much more.
Get Your Price